IERG 4210 / IEMS 5718 - Web Programming and (Internet) Security
Form I - Client-side Implementations
Review Questions
Questions
- Which of the following lines(s) are incorrect, and why? (guess and try validator)
<a ref="https://www.cuhk.edu.hk/">CUHK</a> <img src="../ierg/cuhk.png" /> <link href="styles.css" rel="stylesheet" type="text/css" /> //Place in head or body? <li><a href="#b">About Us<a></li> - What will be the color for "Hello" and "World"?
    *{ color: red; }
    #a > #c{ color: black; }
    p.c{ color: blue; }
    p#c{ color: green; }


    Hello
    World
- Fix this (about closure and more)
- Click
Agenda
- HTTP
- Introduction & Client-Server Model
- HTTP Request and Response
- HTML Forms: Basics and Input Controls
- Client-side Restrictions
- HTML: The use of form elements
- HTML: HTML5 Validations
- JS: Javascript Validations
- Form Submission Approaches
- Traditional Form Submission
- Programmatic Form Submission
- AJAX Form Submission
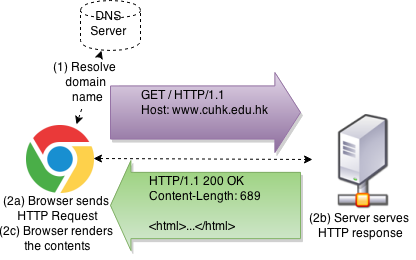
Introduction to HTTP
- HTTP is a text-based application-layer protocol that defines how content is requested from a client application and served by a web server.
- Client-Server
Model
- Popular servers: Apache, Nginx, Node.js, IIS, Google AppEngine
- Popular clients/agents:
Chrome, Firefox,
IEEdge, Safari - (Demo) Using telnet/netcat to make a simple (text-based) request
req.txt | nc www.ie.cuhk.edu.hk 80
""" context of req.txt
GET  /  HTTP/1.1
Host: www.ie.cuhk.edu.hk
Connection: close

"""
//ensure newline is \r\n instead of \n; and the newline after Connection: close
Client-Server Model
Surfing the Web using netcat
        $ nc www.ie.cuhk.edu.hk 80 (assume we send the HTTP request)
        GET / HTTP/1.1
        Host: www.ie.cuhk.edu.hk

        HTTP/1.1 301 Moved Permanently
        Date: Wed, 03 Feb 2021 18:11:26 GMT
        Server: Apache
        Location: https://www.ie.cuhk.edu.hk/
        Content-Length: 235
        Content-Type: text/html; charset=iso-8859-1

        <!DOCTYPE HTML PUBLIC "-//IETF//DTD HTML 2.0//EN">
        <html><head>
        <title>301 Moved Permanently</title>
        </head><body>
        <h1>Moved Permanently</h1>
        <p>The document has moved <a
        href="https://www.ie.cuhk.edu.hk/">here</a>.</p>
        </body></html>
Typical HTTP Requests
- GET request::
GET /testing?q=abc HTTP/1.1 Host: course.ie.cuhk.edu.hk - POST request:
POST /testing?q=abc HTTP/1.1 Host: course.ie.cuhk.edu.hk Content-Length: 105 Content-Type: application/x-www-form-urlencoded name=World&gender=M&email=xxx%40ie.cuhk.edu.hk&address=SHB%2C+CUHK%2C+NT®ion=NT&action=updInfo - Specifications:
- Version: HTTP/1.0, HTTP/1.1, HTTP/2.0
- Method:
GET,POST,PUT,HEAD,DELETE,TRACE,OPTIONS,CONNECT, etc... - Parameters: query string vs. body
- Headers: hostname, content-length, content-type
Typical HTTP Response
HTTP/1.1 200 OK
Date: Mon, 26 Jan 2015 17:00:28 GMT
Content-Length: 413
Content-Type: text/html

<HTML>...</HTML>- Version: HTTP/1.0, HTTP/1.1, HTTP/2.0
- Status: 1xx for Informational, 2xx for Successful, 3xx for Redirection, 4xx for Client Error, and 5xx for Server Error
- Headers: content-length, content-type, and many more for authentication, cookies, security, caching, redirection
- Body: the content
HTML Forms
- The prevalent approach to solicit information from users
- A
<form>tag that comprises different form controls, e.g.,<input>,<select>, see a typical example below:<fieldset> <legend>Personal Information</legend> <form method="POST" action="incl/process.php"><ul><li> <label>Name*</label> <div><input type="text" name="name" required /></div> </li><li> <label>Gender*</label> <div><input required type="radio" name="gender" value="M" /> M <input type="radio" name="gender" value="F" /> F</div> </li><li> <label>Email*</label> <div><input type="email" name="email" required placeholder="john@example.com" /></div> </li><li> <label>Address*</label> <div><textarea name="address" required></textarea></div> </li><li> <label>Region*</label> <div><select required name="region"> <option value="">Choose</option> <option value="HK">HK</option> <option value="KL">KL</option> <option value="NT">NT</select> </div> </li> </ul> <input type="hidden" name="action" value="updInfo" /> <input type="submit" value="Send" /><span> * denotes a required field.</span> </form> </fieldset>
<form> Attributes
- A typical
<form>takes at least two attributes:<form method="POST" action="process.php"> <!-- included here are some form controls --> </form> method="POST"ormethod="GET"(default: GET)- POST is used if a request is going to incur permanent change on server data; while GET is used for retrieving data
action="process.php"(default: the current URL)- the value takes a URL that will accept the form request
onsubmit="return false"is optionalonsubmitis triggered when the submit button is clicked.return false;prevents default behaviour, stop propagation (bubble-up), and callbacks- Often used when the form is submitted over AJAX (cancel the form submit event)
(to be discussed in later slides)
enctype="multipart/form-data"is optional- Default encoding is
application/x-www-form-urlencodedd - When
<input type="file"/>is used for file upload
- Default encoding is
Form Controls (1/4: Most Common Controls)
- A typical form control is defined as follows:
<!-- <label> is to focus on a field when clicked --> <label for="field1">Field 1: </label> <input type="text" name="param1" id="field1" /> - Text field
First Name: <input type="text" name="firstname" value="World"/>Password: <input type="password" name="name" value="abc"/>Hidden? <input type="hidden" name="action" value="updateData"/>Form Controls (2/4: Offering Choices)
- Radio box (limit to a single choice for radios under the same name)
<input type="radio" name="sex" value="M" checked="true" /> Male
<input type="radio" name="sex" value="F" /> Female<input type="checkbox" name="item[]" value="A" checked="true"/> A
<input type="checkbox" name="item[]" value="B" /> B(single selection; or try the multiple attribute)
Which OS do you like:
<select name="OS">
    <option name="1">iOS</option>
    <option name="2" selected="true">Android</option>
</select>
Form Controls (3/4: More Controls)
- Textarea (Multi-line text field)
Description:
<textarea name="desc" > text to be displayed </textarea>Photos: <input type="file" name="pics" /><input type="submit" value="Go" />
<input type="image" src="pics/go.gif" />
Form Controls (4/4: HTML 5 New Controls)
- Email and Date Field
<form>Email:*
    <input type="email" name="email" required />
    <input type="date" />
</form><style>:valid{border:1px solid #0F0}
:invalid{border:1px solid #F00}</style>
<form>URL: <input type="URL" name="url" /></form><form><input type="search" name="q" placeholder="Search..." /></form>
<form>Amount: $
    <input type="text" name="amount" pattern="^[\d,.]+$" />
</form>
- Tags with more semantic information: Built-in support of client-side validations
- New CSS pseudo-class:
:valid,:invalid,:requiredand:optional
(keyword for a selected element dependent on its content or external factors) - For compatibility, check with https://caniuse.com/
Regular Expressions
- A language to recognize string patterns
-
Refer to a Cheatsheet for reference
What you must know:
- ^ - start of string; $ - end of string (IMPORTANT to validations!)
- + - one or more times; ? - 0 or 1 times; * - 0 or more times
- Examples:
- Float (\d includes digits only, the char inside "[]" defines a character set):
^[\d\.]+$
- Alphanumeric (\w includes letters, digits, underscore):
^[\w\-, ]+$
- Email (apparently '\' is the escape character here ["{}" stats the no. of pattern to match]):
^[\w\-\/][\w\'\-\/\.]*@[\w\-]+(\.[\w\-]+)*(\.[\w]{2,6})$The regular expression for email address is readily available on Web.
(You need to first know what constitutes a valid email address to write this regex.)
IMPORTANT: Consult credible websites for reusable rigorous patterns!!
- Float (\d includes digits only, the char inside "[]" defines a character set):
Short Regular Expression Test
- Which of the following string(s) match the regex
^[\d\.]+$- 42a.4
- 4.3
- 192.168.0.1
- How about this regex
[+-]?([0-9]*[\.])?[0-9]+
- Write a regex to check for a 10 digit number that start with 1 (e.g., SID).
- Extra:
- wildcard character (dot ".")
- [^abcd]: Not character a,b,c,d; [\W] NON-alphanumeric
- (123|456) match 123 or 456; bracket "creates" a matching group ("string")
Client-side Restrictions
- To inform the users early on for input errors
- To create a more interactive and responsive UI experience
- Otherwise, input errors are prompted only after form submissions (round-trip delay)
- To imply a specific pattern that a user is expected to follow
- To help users enter/choose the valid data that we need
- Yet, these restrictions can be bypassed by Parameter Tampering Attacks!! Don't count on them for security!!
- Reason: A user has full control of any client-side code downloaded to his browser using Developer Tools (and other extensions: ChroPath, TamperMonkey)
- Hence, you need input validations implemented on BOTH
- server-side for security enforcement, and
- client-side for better user experience.
3 Approaches of Client-side Restrictions
- The use of different form controls
- e.g., Radioboxes for genders implies a restriction on only two possible values, i.e., M or F
- e.g., Dropdown menu implies a restriction on accepting some default choices
- Validations with HTML5 (shown in the previous slide)
- The first built-in support of client-side validations by IE 10+, Firefox 4+, Chrome, etc.
- e.g., Email, URL, Search, and Custom fields we just see
- Validations with Javascript
(to be discussed in next slide)
- The programmatic way to customize input patterns
- Well-supported across browsers
Form Validations with Javascript (1/4)
- Strategy: Write your code in HTML5 for new browsers; Fallback to Javascript for legacy ones
- Given a form that has an HTML5 Email field,
<form id="loginForm" method="POST">
Email: <input type="email" name="em" /><br/>
Password: <input type="password" name="pw" /><br/>
<input type="submit" value="Login" />
</form>
Note: Unsupported type will fallback to an ordinary textfield
- Add the title, HTML5 requried and pattern attributes
<form id="loginForm" method="POST">
    Email: <input type="email" name="em" title="valid email" required
        pattern="^[\w\-\/][\w\'\-\/\.]*@[\w\-]+(\.[\w\-]+)*(\.[\w]{2,6})$" /><br/>
    Password: <input type="password" name="pw"
        title="valid password" required /><br/>
    <input type="submit" value="Login" />
</form>
Note:
- Unsupported attributes will be ignored in legacy browsers
- The regular expression for email address is readily available on Web.
Form Validations with Javascript (2/4)
- To validate the form right before form submission:
<form id="loginForm" method="POST">
    Email: <input type="email" name="em" title="valid email" required pattern="^[\w\-\/][\w\'\-\/\.]*@[\w\-]+(\.[\w\-]+)*(\.[\w]{2,6})$" /><br/>
    Password: <input type="password" name="pw" title="valid password" required /><br/>
    <input type="submit" value="Login" />
</form>
<script type="text/javascript">
var loginForm = document.getElementById('loginForm');
// Do this only if the HTML5 Form Validation is absent
if (!loginForm.checkValidity || loginForm.noValidate)
    // to listen on the submit event of "loginForm"
    loginForm.onsubmit = function(){
    // a private function for displayError
    function displayErr(el,msg){alert('FieldError: ' + msg);el.focus();return false}
    // looping over the array of elements contained in the form
    for (var i = 0, p, el, els = this.elements; el = els[i]; i++) {
        // validate empty field if required attribute is present
        if (el.hasAttribute('required') && el.value == '')
        return displayErr(el, el.title + ' is required');
        // validate pattern if pattern attribute is present
        if ((p = el.getAttribute('pattern')) && !new RegExp(p).test(el.value))
        return displayErr(el, 'in' + el.title);
    }
    // If false is returned above, the form submission will be canceled;
    // If false is NOT returned, the form will submit accordingly
    }
</script>
Form Validations with Javascript (3/4)
- With an HTML5-compilant browser, JS validation is ignored:
- HTML5 Validation can be disabled with
novalidateattribute:
Note: POST Parameters can be accessed only by server but not JS. Hence, nothing is shown here after submission. Firebug can show what was already sent.
Note: Need to perform compatibility tests? try some online services or install those in Virtual Machines
Form Validations with Javascript (4/4)
- Recall the best practice: Graceful Degradation
(in Lecture 2)
- if (HTML5 supported) use the native HTML5 Validation
- else if (JS supported) use the JS validation code
- else the form still works without any validations
- Extend the code to also validate
radioandcheckboxfor (var i = 0, p, el, els = this.elements; el = els[i]; i++) { // validate empty field, radio and checkboxes if (el.hasAttribute('required')) { if (el.type == 'radio') { if (lastEl && lastEl == el.name) continue; for (var j = 0, chk = false, lastEl = el.name, choices = this[lastEl], choice; choice = choices[j]; j++) if (choice.checked) {chk = true; break;} if (!chk) return displayErr(el, 'choose a ' + el.title); continue; } else if ((el.type == 'checkbox' && !el.checked) || el.value == '') return displayErr(el, el.title + ' is required'); } if ((p = el.getAttribute('pattern')) && !new RegExp(p).test(el.value)) return displayErr(el, 'in' + el.title); }Code Demo. Reading: MDN Client-side form validation
3 Form Submission Approaches
- Traditional Form Submission
(demonstrated in the previous slide)
- Triggered by a submit button or the Enter key
- Fires the
submitevent, where one can validate before a form submission
- Programmatic Form Submission
- Recommended to use this only when submitting a form automatically
<form method="POST" id="buildAutoPostReq"><!-- Some hidden fields here --></form> <script type="text/javascript">document.forms[0].submit();</script> - Unfortunately, programmers (incl. HSBC) who don't know
<input type="image">like to do this for images: When an image is clicked,Form.submit()will be finally called if a form is properly validated - BAD: NO
submitevent is fired. Without code analysis, difficult to know whether a submission has actually occurred
- Recommended to use this only when submitting a form automatically
- AJAX Form Submission
(to be discussed in the next slide)
- AJAX: Asynchronous Javascript and XML; It's all about the
XMLHttpRequestAPI, study it before using it to submit form data
- AJAX: Asynchronous Javascript and XML; It's all about the
AJAX Form Submission (1/3)
- Demonstration:
- Advantages:
- Modern user experience
- Eliminate page-load effect (no blank screen);
- Only load the changed part when it "arrives"
- Using the well-known
XMLHttpRequestAPI- Sends requests at background; not limited to only send form data :)
- Cancel the default form submissions
- returns
falsein thesubmitevent
- returns
- Modern user experience
AJAX: Synchronous vs. Asynchronous (1/3)
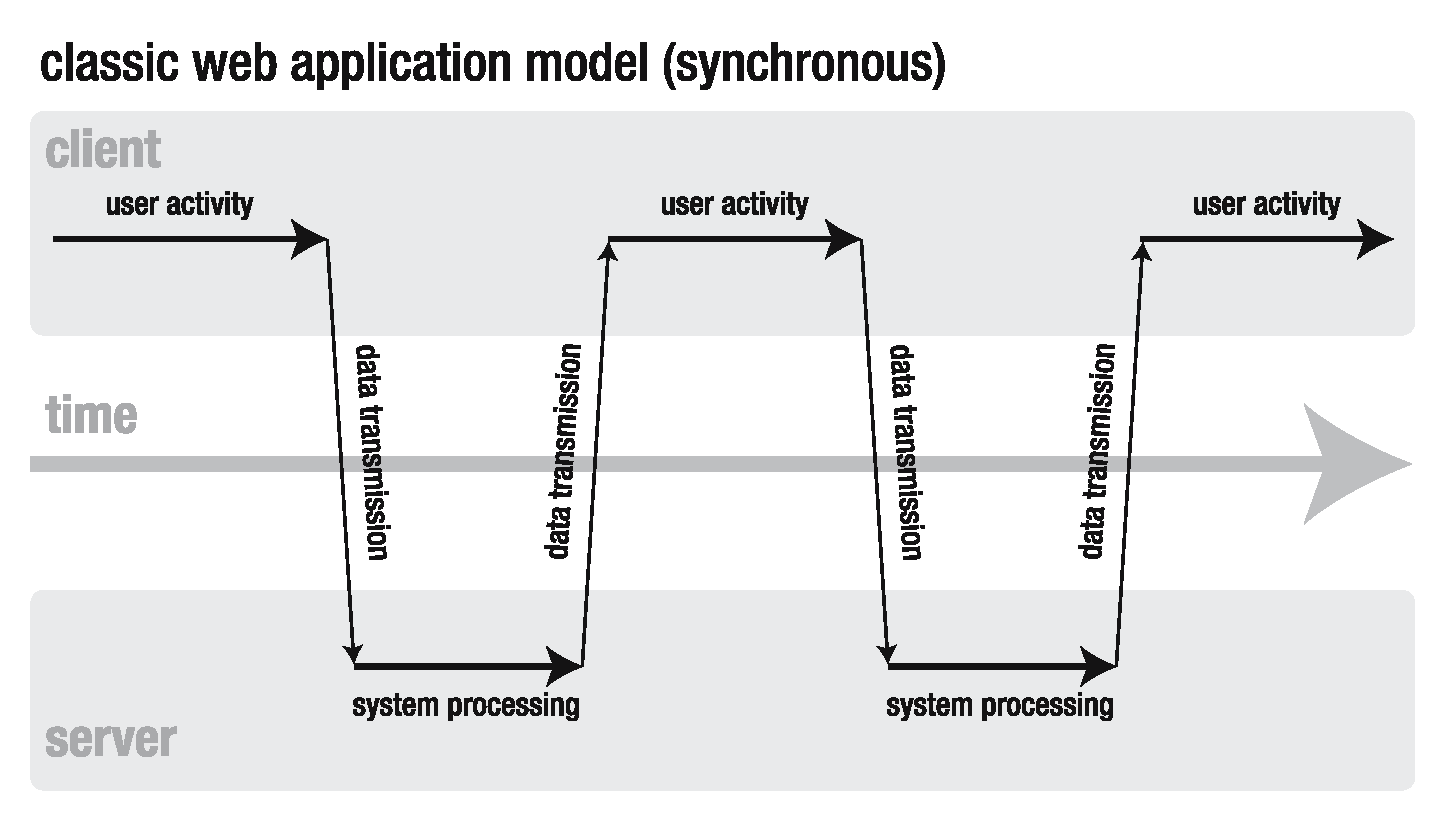
As opposed to asynchronous calls, synchronous calls are blocking (hangs) until the server returns, i.e., less efficient.
AJAX: Synchronous vs. Asynchronous (2/3)
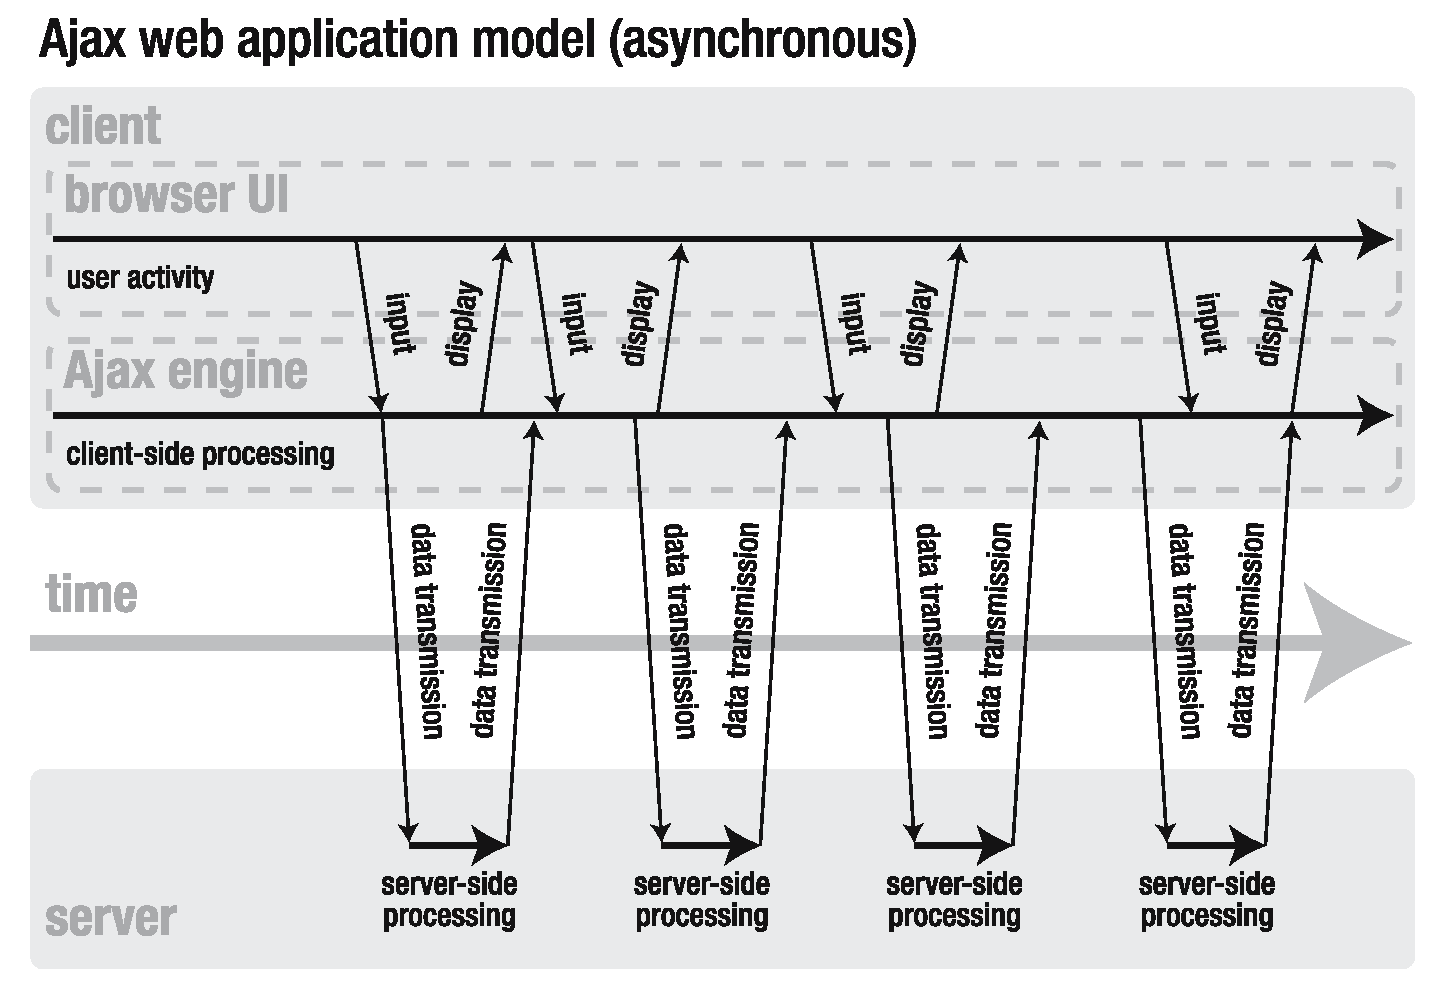
AJAX: Synchronous vs. Asynchronous (3/3)
- Principle: Do
something else while eating
- Dispatch many requests at a time. Also do something else.
- Get notified when the server returns, then render the results.
- The responses will likely be out of order.
- Typical workflow
in AJAX Form submission (shown in the previous slide)
- Listen to
submitevent - Cancel the default form submission
- Craft a
POSTrequest to send over AJAX - On feedback received, echo the feedback
- Listen to
-
Event listeners: progress, load, error, abort
- xhr.open, xhr.send, xhr.onreadystatechange (0-4; 4: completed), xhr.setRequestHeader (in some cases, you need to deal with CORS)
- Can use FormData Object (large part of the following slides can be simplified
- https://developer.mozilla.org/en-US/docs/Web/API/XMLHttpRequest_API/Using_XMLHttpRequest
AJAX: Implementation w/ XMLHttpRequest
// e.g., to call, myLib.ajax({url:'process.php?q=hello',success:function(m){alert(m)}});
myLib.ajax = function(opt) { opt = opt || {};
var xhr = (window.XMLHttpRequest)                  // Usu. ?/|| is for compatibility
        ? new XMLHttpRequest()                     // IE7+, Firefox1+, Chrome1+, etc
        : new ActiveXObject("Microsoft.XMLHTTP"),  // IE 6
    async = opt.async || true,
    success = opt.success || null, error = opt.error || function(){/*displayErr()*/};
// pass three parameters, otherwise the default ones, to xhr.open()
xhr.open(opt.method || 'GET', opt.url || '', async); // 3rd param true = async
if (opt.method == 'POST')
    xhr.setRequestHeader("Content-Type", "application/x-www-form-urlencoded");
// Asyhronous Call requires a callback function listening on readystatechange
if (async)
    xhr.onreadystatechange = function(){
    if (xhr.readyState == 4) { // 4 is "more ready" than 3 or 2
        var status = xhr.status;
        if ((status >= 200 && status < 300) || status == 304 || status == 1223)
        success && success.call(xhr, xhr.responseText); // raw content of the response
        else if (status < 200 || status >= 400)
        error.call(xhr);
    }
    };
xhr.onerror = function(){error.call(xhr)};
// POST parameters encoded as opt.data is passed here to xhr.send()
xhr.send(opt.data || null); // return RHS if LHS is any false value [use && for null/undefined]
// Synchronous Call blocks UI and returns result immediately after xhr.send()
!async && success && success.call(xhr, xhr.responseText);
};AJAX Form Submission (2/3)
- To generate POST parameters based on the control values
myLib.formData = function(form) { // private variable for storing parameters this.data = []; for (var i = 0, j = 0, name, el, els = form.elements; el = els[i]; i++) { // skip those useless elements if (el.disabled || el.name == '' || ((el.type == 'radio' || el.type == 'checkbox') && !el.checked)) continue; // add those useful to the data array this.append(el.name, el.value); } }; // public methods of myLib.formData myLib.formData.prototype = { // output the required final POST parameters, e.g., a=1&b=2&c=3 toString: function(){ return this.data.join('&'); }, // encode the data with the built-in function encodeURIComponent append: function(key, val){ this.data.push(encodeURIComponent(key) + '=' + encodeURIComponent(val)); } }; - So, this can feed the data parameter for
myLib.ajax({data:""})
AJAX Form Submission (3/3)
- We build another reusable function submitOverAJAX()
myLib.submitOverAJAX = function(form, opt) { var formData = new myLib.formData(form); formData.append('rnd', new Date().getTime()); opt = opt || {}; opt.url = opt.url || form.getAttribute('action'); opt.method = opt.method || 'POST'; opt.data = formData.toString(); opt.success = opt.success || function(msg){alert(msg)}; myLib.ajax(opt); }; - Finally, specify the form and a corresponding callback
function el(A) {return document.getElementById(A)};
var loginForm = el('loginForm');
loginForm.onsubmit = function(){
// submit the form over AJAX if it is properly validated
myLib.validate(this) && myLib.submitOverAJAX(this, {success:function(msg){
        el('result').innerHTML = 'Echo from Server: $_POST = ' + msg.escapeHTML();
    }});
    return false;     // always return false to cancel the default submission
}
Our myLib.js so far...
When all the functions (incl. myLib.validate()) are built in a single library
Better Approach
- We don't need our own Form Data parser; use FormData()
- Field can be added easily via append(), e.g., form.append("fieldName", "value")
const form = document.querySelector("#userinfo");

async function sendData() {
  // Associate the FormData object with the form element
  const formData = new FormData(form);

  try {
    const response = await fetch("https://example.org/post", {
      method: "POST",
      // Set the FormData instance as the request body
      body: formData,
    });
    console.log(await response.json());
  } catch (e) {
    console.error(e);
  }
}

// Take over form submission
form.addEventListener("submit", (event) => {
  event.preventDefault();
  sendData();
});
Summary
- HTML forms with different input controls
- 3 Methods to perform client-side data validation/restriction
- Short introduction to Regular Expression
- Different ways to perform form data submission